2008年1月29日 星期二

Youtube 電影 短片下載 (超詳細教學)

嘿嘿~今天在7-11看書,發現了Mytube player這個好東西。
所以分享給大家啦,大家可以把Youtube上的電影短片下載下來唷!


所需工具如下免費下載:

.NET Framwork 2.0以上的版本

下載 Microsoft .NET Framework 2.0
or
下載 Microsoft .NET Framework 3.5 Bate


主要的youtube電影下載工具

下載 Mytube player

額外也可以下載 flv播放器,以後要看.flv檔可以用

下載 FLVplayer 1.2
或者
下載 FLVplayer 2


該有的檔案下載好了的話,就看以下教學唷!圖多,不過很詳細唷!

本教學以.NET Framwork 3.5為例,如果您之前以裝過.NET Framwork 2.0或以上版本的話,此安裝NET Framwork 的步驟就跳過直接看My Tube player的安裝與使用教學啦。

.NET Framwork 3.5安裝過程
step1.
安裝下載好的.NET Framwork 3.5,檔名為dotNetFx35setup,如圖所示。


step2.
安裝過程有點小久。


step3.
選擇①的選項,並按下安裝②。


step4.
此下載過程以200~300k在跑,大約要十一分左右,就等他完成下載吧。


step5.
下載後出現的畫面,"下載完成"並不代表"安裝完成"唷^^,所以這時候不要動他唷,讓他繼續跑。


step6.
安裝畫面


step7.
安裝成功了,請點選結束。


step8.
哈~要重新開機。為安全起見,就給他點下去嘍 。
不過要記得回來看My Tube player的安裝與使用教學內。


My Tube player的安裝與使用教學

step1.
安裝下載後的MyTubePlayerSetup(①處)。
出現安裝畫面,請點Next下一步(②處)。


step2.
①處是安裝的路徑不用改
②處你可以選擇"Everyone",也就是在這台電腦上所有的使用者帳號都可以用此軟體。
或者你也可以選擇"Just me",也就是只有你自己使用。
再來按下"Next"下一步➂。


step3.
再來就都下一步啦。看圖就知道^^。


step.
安裝完成,請按"Close"離開安裝程式。


step5.
開始使用嘍。
到桌面執行My Tube Player,如圖所示。


step.
這是程式啟動後的畫面。


step7.
然後到youtube上找到你要的電影。
這裡以醬爆弟弟(Soulja boy)為示範^^。
將該網址全選複製下來。(紅框框的地方)


step8.
然後將youtube複製的網址貼到程式中的空白文字方塊內(①處紅色框圈起來的地方)。
再來按下Download按鈕(②處)。


step9.
這時候左下方就開始下載啦。


step10.
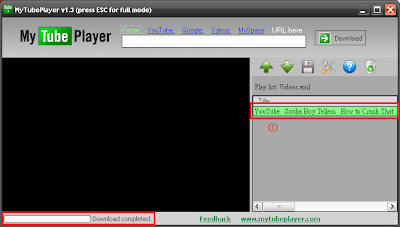
下載後不會馬上播放,而是在右方會跑出下載後的檔案清單(①處)。
而左下方就顯示下載完成。


step11.
這時候點擊右方的電影名稱就可以觀看啦。
當然可以在繼續下載其他在youtube上的檔案嘍。


step12.
下載後的檔案,基本上是放在C:\Program Files\MyTubePlayer\Data下(②所示)。
若你有改安裝路徑的話就要找一下啦。忘記的話,搜尋MyTubePlayer應該就找得到了。
檔名就如圖中的①與③所示。

教學完畢。大家辛苦啦。


備註:這個軟體從功能上看來,也可以下載google video、yahoo video、myspace video的電影片段,可是我測試了過後,是不行的,不支是我電腦的關係還是怎樣。
也許大家也會想問說,無名的可不可以下呢?答案是,不可以。因為我也試過了。
會跳出錯誤訊息。ㄏㄏ

2008年1月28日 星期一

Ubuntu 登入畫面顯示「.dmrc」被忽略 解決方式

開啟終端機,輸入以下指令,

ps.????是該使用者帳號唷。
sudo chmod -R 755 /home/????

然後在輸入

sudo chmod 644 /home/????/.dmrc

這樣就大功告成啦!!

Ubuntu 7.10 Firefox 開啟速度加快修正

使用root權限開啟 /usr/lib/firefox/firefox

sudo gedit /usr/lib/firefox/firefox

在moz_pis_startstop_scripts()的上面加入,

export MOZ_DISABLE_PANGO=1

如圖所示,加入後存檔即可,記得重開firefox唷

2008年1月27日 星期日

ubuntu 安裝 vsftp 教學與 設定 配置

圖一、到「系統→管理→Synaptic套件管理程式」


圖二、按下搜尋


圖三、輸入「vsftp」,並按下搜尋。


圖四、找到vsftp後在核取方塊上點一下,選擇標記為安裝。

接下來安裝後就要看文字了。

安裝完後。來設定vsftp.conf檔案嘍。

本教學是的ftp權限使用方式是。

匿名:
無法使用

實體用戶:
建立一個mkblog作為例子
mkblog使用者可以上傳下載建立資料夾,只限在自己的家目錄,無法瀏覽其他資料夾。
相對的也可以建立更多使用者,方式都一樣


你可以使用root開啟檔案總管,然後開啟/etc/vsftpd.conf,並編輯他
或者是直接在終端機內輸入。

sudo gedit /etc/vsftpd.conf

接下來以下為我的參數設定:
#==================================================

# Example config file /etc/vsftpd.conf
#
# The default compiled in settings are fairly paranoid. This sample file
# loosens things up a bit, to make the ftp daemon more usable.
# Please see vsftpd.conf.5 for all compiled in defaults.
#
# READ THIS: This example file is NOT an exhaustive list of vsftpd options.
# Please read the vsftpd.conf.5 manual page to get a full idea of vsftpd's
# capabilities.
#
#
# Run standalone? vsftpd can run either from an inetd or as a standalone
# daemon started from an initscript.
listen=YES
#
# Run standalone with IPv6?
# Like the listen parameter, except vsftpd will listen on an IPv6 socket
# instead of an IPv4 one. This parameter and the listen parameter are mutually
# exclusive.
#listen_ipv6=YES
#
# Allow anonymous FTP? (Beware - allowed by default if you comment this out).
anonymous_enable=NO
#
# Uncomment this to allow local users to log in.
local_enable=YES
#
# Uncomment this to enable any form of FTP write command.
write_enable=YES
#
# Default umask for local users is 077. You may wish to change this to 022,
# if your users expect that (022 is used by most other ftpd's)
local_umask=022
#
# Uncomment this to allow the anonymous FTP user to upload files. This only
# has an effect if the above global write enable is activated. Also, you will
# obviously need to create a directory writable by the FTP user.
#anon_upload_enable=YES
#
# Uncomment this if you want the anonymous FTP user to be able to create
# new directories.
#anon_mkdir_write_enable=YES
#
# Activate directory messages - messages given to remote users when they
# go into a certain directory.
dirmessage_enable=YES
#
# Activate logging of uploads/downloads.
xferlog_enable=YES
#
# Make sure PORT transfer connections originate from port 20 (ftp-data).
connect_from_port_20=YES
#
# If you want, you can arrange for uploaded anonymous files to be owned by
# a different user. Note! Using "root" for uploaded files is not
# recommended!
#chown_uploads=YES
#chown_username=whoever
#
# You may override where the log file goes if you like. The default is shown
# below.
xferlog_file=/var/log/vsftpd.log
#
# If you want, you can have your log file in standard ftpd xferlog format
xferlog_std_format=YES
#
# You may change the default value for timing out an idle session.
idle_session_timeout=600
#
# You may change the default value for timing out a data connection.
#data_connection_timeout=120
#
# It is recommended that you define on your system a unique user which the
# ftp server can use as a totally isolated and unprivileged user.
#nopriv_user=ftpsecure
#
# Enable this and the server will recognise asynchronous ABOR requests. Not
# recommended for security (the code is non-trivial). Not enabling it,
# however, may confuse older FTP clients.
#async_abor_enable=YES
#
# By default the server will pretend to allow ASCII mode but in fact ignore
# the request. Turn on the below options to have the server actually do ASCII
# mangling on files when in ASCII mode.
# Beware that on some FTP servers, ASCII support allows a denial of service
# attack (DoS) via the command "SIZE /big/file" in ASCII mode. vsftpd
# predicted this attack and has always been safe, reporting the size of the
# raw file.
# ASCII mangling is a horrible feature of the protocol.
#ascii_upload_enable=YES
#ascii_download_enable=YES
#
# You may fully customise the login banner string:
#ftpd_banner=Welcome to OIpingo FTP service.
#
# You may specify a file of disallowed anonymous e-mail addresses. Apparently
# useful for combatting certain DoS attacks.
#deny_email_enable=YES
# (default follows)
#banned_email_file=/etc/vsftpd.banned_emails
#
# You may restrict local users to their home directories. See the FAQ for
# the possible risks in this before using chroot_local_user or
# chroot_list_enable below.
#chroot_local_user=YES
#
# You may specify an explicit list of local users to chroot() to their home
# directory. If chroot_local_user is YES, then this list becomes a list of
# users to NOT chroot().
chroot_list_enable=YES
# (default follows)
chroot_list_file=/etc/vsftpd.chroot_list
#
# You may activate the "-R" option to the builtin ls. This is disabled by
# default to avoid remote users being able to cause excessive I/O on large
# sites. However, some broken FTP clients such as "ncftp" and "mirror" assume
# the presence of the "-R" option, so there is a strong case for enabling it.
#ls_recurse_enable=YES
#
#
# Debian customization
#
# Some of vsftpd's settings don't fit the Debian filesystem layout by
# default. These settings are more Debian-friendly.
#
# This option should be the name of a directory which is empty. Also, the
# directory should not be writable by the ftp user. This directory is used
# as a secure chroot() jail at times vsftpd does not require filesystem
# access.
secure_chroot_dir=/var/run/vsftpd
#
# This string is the name of the PAM service vsftpd will use.
pam_service_name=vsftpd
#
# This option specifies the location of the RSA certificate to use for SSL
# encrypted connections.
rsa_cert_file=/etc/ssl/certs/ssl-cert-snakeoil.pem
# This option specifies the location of the RSA key to use for SSL
# encrypted connections.
rsa_private_key_file=/etc/ssl/private/ssl-cert-snakeoil.key


#可以接受的最大clinet可連線的數目
max_clients=20
#每個ip的最大連線數目
max_per_ip=15
#啟用被動式連線
pasv_enable=YES

#設定連線的port,可以自訂
listen_port=21

#===紅色是有開啟的項目=================


接下來在終端機輸入

sudo gedit /etc/vsftpd.chroot_list

並輸入你要限制的使用者,這個例子是mkblog。


填入後存檔在/etc/下,檔名存成「vsftpd.chroot_list」。
如果你的ftp使用者不只一個的話,就直接打在裡面就可以了。
﹍﹍﹍﹍﹍﹍﹍﹍
ex:
mkblog
mkblognewuser
mkhomeboy
mkweb
.
.
.等等
﹍﹍﹍﹍﹍﹍﹍﹍


然後建立該使用者
新增一位使用者名為mkblog,密碼要六個以上唷!
輸入後按下確定。就新增一位使用者了。


再來是歡迎訊息。
使用筆記本編輯一些文字後,將檔案存成「.message」別懷疑沒錯,
就是這個檔名,然後放在每一位使用者的家目錄下。
以這個例子mkblog使用者,我就把「.message」存在 /home/mkblog底下就可以了。

你也可以根據不同的使用者,而編輯不同的歡迎訊息。
不過切記。檔案名稱一定要「.message」,因為是放在不同的資料夾,所以不用擔心。


最後在到終端機輸入

sudo /etc/init.d/vsftpd restart

重新啟動vsftpd就完成啦。
並且以後重開機後,用戶就可以直接連線,不部用登入桌面來啟動vsftpd唷!

2008年1月25日 星期五

Taiwan Vitas!! 台灣Vitas!! 超強的啦

這個人叫做,盧廣仲。

唱Vitas的歌內~~比"楊宗緯"還強~高音飆得上唷~!!太強了
還編唱邊彈吉他~~佩服阿

唱的好好笑唷~~表情真豐富,邊唱邊帶台語內~
還你妹妹你爸爸勒~~ㄏㄏ

推薦 drupal 外文參考書 Pro Drupal Development drupal使用者必備

好書推薦
書名:Pro Drupal Development drupal


這是一本drupal的開發書籍,有接觸drupal的人一定要擁有他!

詳細的原文介紹如下

Drupal is one of the most popular content management systems in use today. With it, you can create a variety of community-driven sites, including blogs, forums, wiki-style sites, and much more. Pro Drupal Development was written to arm you with knowledge to customize your Drupal installation however you see fit. The book assumes that you already possess the knowledge to install and bring a standard installation online. Then authors John VanDyk and Matt Westgate delve into Drupal internals, showing you how to truly take advantage of its powerful architecture.

Youll learn how to create your own modules, develop your own themes, and produce your own filters. You’ll learn the inner workings of each key part of Drupal, including user management, sessions, the node system, caching, and the various APIs available to you. Of course, your Drupal-powered site isnt effective until you can efficiently serve pages to your visitors. As such, the authors have included the information you need to optimize your Drupal installation to perform well under high-load situations. Also featured is information on Drupal security and best practices, as well as integration of Ajax and the internationalization of your Drupal web site. Simply put, if you are working with Drupal at all, then you need this book.

* This book is written by Drupal core developers.
* Drupal architecture and behavior are mapped out visually.
* Common pitfalls are identified and addressed.
* Chapters provide regular discussion and reference to why things work they way they do, not just how.
* The front matter features a foreword by Dries Buytaert, Drupal founder.

主要大綱

1. How Drupal Works
2. Writing a Module
3. Module-Specific Settings
4. The Menu System
5. Working with Databases
6. Working with Users
7. Working with Nodes
8. The Theme System
9. Working with Blocks
10. The Form API
11. Manipulating User Input: The Filter System
12. Searching and Indexing Content
13. Working with Files
14. Working with Taxonomy
15. Caching
16. Sessions
17. Using jQuery
18. Localization
19. XML-RPC
20. Writing Secure Code
21. Development Best Practices
22. Optimizing Drupal
23. Installation Profiles
APPENDIX A: Database Table Reference
APPENDIX B: Resources


大家可以,點我免費欣賞(D.L)^^這本書

2008年1月24日 星期四

Firefox 更換 LiHei Pro 儷黑Pro 字型 (超詳細教學)

這一篇文章基本上是基於爽度的問題^ ^。因為要是系統的字型改為蘋果電腦的字型後,可是發現firefox火狐瀏覽器竟然部份字體還是醜醜的,所以為了美觀。而改變firefox火狐瀏覽器的字型。
就來教大家如何將firefox火狐瀏覽器改成蘋果電腦的字型吧!

基本上這篇滿簡單的,不過在改之前要確定你的Ubuntu系統,已經安裝好蘋果電腦的LiHei Pro 儷黑Pro字型唷!安裝方式可以參考「Ubuntu 更換 LiHei Pro 儷黑Pro 字型 (超詳細教學)」。

以下是更改教學。


圖一、這是還firefox火狐瀏覽器還沒改字型的情況。可以看出firefox火狐瀏覽器的字型與網頁內容不搭吧!不是很好看。所以呢!就改字型啦!


圖二、點選「編輯→偏好設定」。


圖三、在最上方請先選擇「內容」(就是那顆地球),然後在(↑①處)點下。


圖四、找到LiHei Pro字體後,選擇它。(就如上圖所示)
再來點選「進階」(↓①處)。


圖五、將(←①)紅色框內的所有字型改為LiHei Pro。


圖六、改完後如圖上所示,最後再按下「確定」(↓①處)。
這樣就大功告成啦。

圖七、修改後漂亮多了,爽度也一百。^ ^

圖八、這是瀏覽yahoo首頁的畫面。好漂亮唷!

備註:windows下雖然可以安裝LiHei Pro字型與firefox火狐瀏覽器,不過在windows下看LiHei Pro會很醜。因為LiHei Pro是Unicode的字型,而windows作業系統是以Big-5為主,所以會很不搭。不過如過大家想在windows下有相同的效果的話,建議將字型改為「Ariel unicode MS」,也有雷同的美感唷!

點這裡看更多文章

Ubuntu 更換 LiHei Pro 儷黑Pro 字型 (超詳細教學)

各位使用ubuntu的朋友一定會覺得,預設的字型不好看。偏偏又想換預設以外字型的話。這篇就是教各位如何更換預設以外的字型啦!

這篇是以蘋果電腦的字型為例,因為本人太愛蘋果電腦的字型了,可是沒錢買就只好用這招啦。^ ^

請大家先下載>>"LiHei Pro 儷黑Pro 字型" ,這是蘋果電腦所使用的字型。
下載後將他解壓縮到你的電腦內吧!

接下來請使用root的權限開啟檔案總管。(可以參考「如何使用root的權限開啟檔案總管」這一篇文章。)


圖一、請使用root權限開啟檔案總管


圖二、然後在(←①處)輸入「/usr/share/fonts/truetype/」後,按下enter。


圖三、進入/usr/share/fonts/truetype資料夾後,你可以選擇建立一各資料夾為
「ttf-macosx」,或者不用也可以,基本上是方便將字型歸類而已。
本人是希望好看一點,所以我有建立。各位可以自己選擇建不建立。


圖四、如圖中所示,將剛剛下載並解壓縮後的「LiHei ProPC.ttf」字型,複製到剛剛建立的「ttf-macosx」資料夾,若您沒建立此資料夾,請複製到「/usr/share/fonts/truetype」下即可。


圖五、複製完後,請開一個終端機視窗,並輸入
「sudo fc-cache -v -f」並按下enter。
基本上,按下enter後不會要你輸入管理者密碼,就可以進入圖六的畫面。如果有提醒您輸入,那就請輸入吧!


圖六、輸入後,讓他跑完後就,如上圖所示。


圖七、在終端機完成後,請點選「系統→偏好設定→字型」。(本人使用的版本是Ubuntu 7.4的版本)
若你是Ubuntu 7.10版本的話,請點選「系統→偏好設定→佈景主題」,並從佈景主題視窗裡面找到字型。


圖八、在紅色框框內的任何一個字型上,點滑鼠左鍵一下,就可以更換字型。


圖九、請選擇(←①處)「LiHei Pro」,並按下確定。字體大小使用預設就可以了。


圖十、依照圖九的作法,將紅色框框內所有的字型都改成 LiHei Pro,最後直接按下右下的「關閉」。
就大功告成啦。


圖十一、最後的比較圖,紅色框框內是還沒改過的字型,大家可以看一下,改過後是不是漂亮多了呢?

若是改完後還沒有明顯的效果,請各位先登出後在登入,就可以看到啦!^ ^

當然Firefoxc火狐瀏覽器也可以改唷,可以參考這一篇「Firefox 更換 LiHei Pro 儷黑Pro 字型 (超詳細教學)」,這樣就更完美啦!

在ubuntu下使用 root 權限開啟檔案總管(超詳細教學)

各為使用ubuntu的使用者們,常常會因為要使用到root權限複製檔案或者是修改檔案內容,而常常要打sudo指令而感到有點麻煩嗎?在此教大家如何建立一桌面捷徑,並且可以使用root的權限直接打開Ubuntu的檔案總管,就可以任意修改檔案或資料唷。
像是換字型,也可以透過這個來作唷!

大家可以參考「Ubuntu 更換 LiHei Pro 儷黑Pro 字型 (超詳細教學)」這篇文章。

這對新手或者老手來說都是易學,且有用的唷!

對於使用windows而轉換到ubuntu的使用者所使用的經驗來說,此方法會方便你進入ubuntu的世界唷。

請看以下詳細的圖文教學。


圖一、在桌面上點擊滑鼠右鍵,並選擇「新增啟動圖示」。


圖二、在類型的下拉式選單(①→處),點一下。


圖三、並選擇「終端機中的程式」(←①處)。


圖四、並在名稱欄位輸入「用root權限開啟檔案總管」(←①處,可以自己取喜歡的名稱)
然後在指令欄位輸入「sudo nautilus」(←②處)
最後按下「確定」


圖五、桌面上就多了一個「使用root權限開啟檔案總管」的捷徑。
請左鍵點兩下啟動他。


圖六、會跳出一各終端機視窗,要你輸入管理者的密碼。輸入後按下enter。
ps.在linux的作業系統下,在終端機輸入密碼是看不到*號的,與windows不同
使用者請注意唷!所以別當作當機,有輸入正確即可。


圖七、輸入密碼按下enter後,會自動跑圖中所顯示的這些指令。就等他跑完吧!


圖八、以上指令跑完畢後,就會跳出檔案總管啦,這時候就可以為所欲為啦,就當成是在windows下開檔案總管了。

最後當你執行完你要做的事後!將這個以root開啟的檔案總管視窗關掉,root的權限就會自動消除啦。這樣也就回復一般的身份了^ ^。以後有用到在直接執行這個捷徑就ok嘍。

此方法,在以後常用ubuntu的時候一定會很實用。
感謝大家加入ubuntu的世界,也祝大家使用ubuntu愉快唷!